
Insert (or re-insert after burning) SD card reader / SD card.

Open the drive that appears labeled as "boot" and find and open file "SETUP.html" in Chrome or Firefox browser. (These browsers are compatible with generating necessary text files.)

Enter your WiFi router's name and password and click the button "CREATE WIFI CONFIGURATION FILE" Note: This will only be used to generate a text file that will be saved to the SD card's boot drive.

After clicking the button, the file "wpa_supplicant.conf" will be dowloaded most likely to your "Downloads" folder depending on your system configuration. You will need to move it to the "boot" drive on the SD card. Make sure the filename is "wpa_supplicant.conf" and NOT something like "wpa_supplicant(1).conf". Below is how it should look:

Next, scroll down on the SETUP.html file in your browser and complete the form to start logging with your Tilt and get an email to the Tilt Pi dashboard. Note: It is required to have a Gmail address to get the emailed link to the Tilt Pi dashboard.

After entering your beer name (or any descriptive name) and gmail address, click the button "CREATE CLOUD CONFIGURATION FILE" See example below:
Save this file in the same location as the "wpa_supplicant.conf" file saved earlier.

Eject the SD card and load the card into your Raspberry Pi.

Plug in your Raspberry Pi and make sure to have your Tilt floating nearby. The Tilt Pi will look for your Tilt so make sure it is on (floating or sitting diagonally).

You should receive an email with a link to your Google Sheets log and about 30 seconds later a link to your Tilt Pi dashboard.


Troubleshooting:
First go to tilthydrometer.com and click on the "Tilt Pi" menu item. On the next screen click the "Download Now" button to download the latest version of Tilt Pi SD card image. Note if you want to connect your Raspberry Pi to a monitor, select the HDMI version as described on the page.
Next, open the "Raspberry Pi Imager" app (download it here: https://www.raspberrypi.com/software/). Select the custom OS option and then select the downloaded SD card image in the previous step.

Insert your SD card reader with an 8GB card or greater. There is no need to format the card, all contents on the card will be erased and the card will be automatically reformatted.
In the settings option (gear icon) for the Raspberry Pi Imager you can now set a number of configurations for the SD card image that was not possible before. (Note: do not change the hostname, this will prevent Tilt Pi from starting) These instructions will cover only basic settings. First is setting the WiFi password: (Note: in the next blog part of this setup instruction, the WiFi password is entered using another method. If this is already completed, there is no need to complete that part, only one WiFi setup is needed)

After setting the WiFi, go ahead and tap "WRITE" to start making the card. After about 10 minutes Raspberry Pi Imager will complete it's writing operation and you can safely remove the SD card reader from the USB port. For the next step see part 2 here.
]]>


Looking for a pre-built disk image? Skip these steps and download our updated SD card image here:
https://tilthydrometer.com/products/tilt-pi-v2-bookworm-may24-raspberry-pi-sd-card-image-download
Using SSH from another computer or from the Raspberry Pi terminal, enter the following commands.
Update Raspbian packages and install python install utility, "python3-distutils".
sudo apt-get update
sudo apt-get install python3-distutils
Get the “aioblescan” bluetooth scanner module customized with Tilt plugin, unzip downloaded file, go to install folder, and install. Once you complete this step, you can run the command "sudo python3 -u -m aioblescan -T" to verify Tilt scanner is working. Make sure Tilt is nearby and floating if doing the test. Use "ctrl-c" to stop scanning.
wget https://github.com/baronbrew/aioblescan/archive/master.zip
unzip master.zip
cd aioblescan-master/
sudo -H python3 setup.py install
Install node-red update script for Raspberry Pi using node-red version that works with Google Sheets web apps (this install script installs version 0.18.4 which allows following redirects of http POST requests).
bash <(curl -sL https://raw.githubusercontent.com/node-red/linux-installers/master/deb/update-nodejs-and-nodered) --confirm-pi --nodered-version="0.18.4" --node18Install dashboard ui node v2.15.5 globally for node-red and enable auto-start of node-red at boot.
sudo -H npm install node-red-dashboard@2.15.5 -g
sudo systemctl enable nodered.service
Reboot to start node-red on boot.
sudo reboot
Download Tilt Pi app (node-red “flow”) that uses the Aioblescan module
wget -O /home/pi/flow.json https://raw.githubusercontent.com/baronbrew/TILTpi/Aioblescan/flow.json
Run downloaded Tilt Pi app/flow in node-red:
curl -X POST http://localhost:1880/flows -H "Content-Type: application/json" -H "Node-RED-Deployment-Type: nodes" --data "@/home/pi/flow.json"
In a web browser visit http://raspberrypi.local:1880/ui or http://localhost:1880/ui (if not using SSH to install). If this doesn't work, you may need to find the IP address of your Raspberry Pi and go to http://X.X.X.X:1880/ui where X.X.X.X is your Raspberry Pi's IP address.
The Tilt repeater does what it sounds like. It repeats a Tilt hydrometer signal that is in range improving weak Bluetooth signals due to stainless steel, foam, refrigerators, and other signal blockers. It notably improves RF performance in stainless fermentors by repeating data to readouts and loggers like your iPhone, Android, Tilt Pi, and others. Simply place the Tilt repeater on top of the fermentor for an additional ~25 feet range. This extended range makes a big difference allowing the signal to reach more conveniently located logging stations. See picture and current specifications below:
Current Specifications:

Customer photo showing position of Tilt repeater in action.

Close-up view of Tilt repeater in ideal location for extending range outside stainless fermentor.
Now Playing: How to Use the Tilt Repeater
]]>For the water/1.000 (0.0°P) calibration point:
For the 1.120 (28.0°P) solution:
For the 1.061 (15.0°P) solution:
Instructions:
Step 1: Calibrate in Water
We recommend calibrating after changing the battery. When doing so, change the battery, reseal the tube, and then place the Tilt in a pint glass filled with room temperature tap water. Knock off any bubbles attached to the Tilt and wait up to a minute for the reading to calibrate to 1.000. If the SG doesn't change to 1.000 as expected you can try again by removing and re-installing the battery. For this to work, the Tilt must be floating in a range of 0.985 and 1.015. If you are still having trouble calibrating with this method, you can still use the iOS/Android app to calibrate in water by tapping the "Calibrate in Water" button in the app settings.
Step 2: Calibrate in 1.120 (28.0°P) solution
Calibrate a second point at the high end of the Tilt's SG range. First find an appropriate dish or bowl that will allow the Tilt to float freely when filled. Manually hold the Tilt in position of 1.120 to see if it would hit the bottom of the bowl. Tare the bowl on a scale and then fill the bowl with water to determine how much weight it can hold when full. Use this number to multiply by 0.28 to determine how much sugar to use. Dump the water out then add the sugar. Bring the weight up to the max weight you previously multiplied by 0.28. For example, the full bowl of water weighed 600g and 0.28 x 600 = 168g. I then put 168g of sugar in the bowl and brought the weight up to 600g with tap water (i.e. added 432g of water). The resulting solution was 28% sugar by weight which is also equivalent to 28.0°P and a specific gravity of 1.120. Note too that SG is not exactly the same as g/ml since conventional brewing SG is referenced at 60°F/15.6°C and water at this temperature has density of .999 g/ml. Option: Use a hydrometer or brewer's refractometer to verify the solution made using a scale is accurate.
Step 3: Calibrate in 1.061 (15°P) solution
Calibrate a third point in the middle of the Tilt's range. As before, find a bowl that will allow the Tilt to float freely at 1.061. This will be a deeper bowl than what would work for a 1.120 solution. Otherwise, the process will be the same as the 1.120 solution except a value of 0.15 will be used to multiply by the weight of water when the bowl is full. For example the weight of water was 1200g and 0.15 x 1200 is 180g. Add 180g of sugar to the bowl and bring to weight with water 1200g (i.e. add 1020g of water) to make a 1.061 solution. Optional: Again you can verify with hydrometer or refractometer. You can also mix with the 1.120 solution made earlier to make an arbitrary solution to spot check in. See video for more details.
]]>The RGB LED will tell you everything you need to know about battery level. Upon waking up your Tilt (moving the Tilt from a horizontal or vertical position to a floating or diagonal position) you should see 3 green flashes on the LED. This means the Tilt can be used for another brew. If you do not see these flashes you may only have 1 month left of battery. To double check, put the Tilt to sleep and look for 2 blue flashes. If you see these, you will have at least 1 month left of battery. If not, your battery is very low and have an approximate 2 weeks left. At this point we recommend changing the battery. For a detailed explanation see our new video below with tips and a demonstration of running the Tilt with a low battery.
]]>As of Jan. 14, 2019, the iOS app is available on the Apple App Store and the Fire app is available on the Amazon App Store. The Android app is on the Google Play Store. If you do not have access to the Play or Amazon App store download our Android APK file here.
]]>
The single-cap design means fewer parts and improved aesthetics, sanitation, and durability. The specifications remain the same with a food-grade polycarbonate body, cap and a single nitrile washer to seal the tube. Internal tests have shown excellent performance, comparing well with previous versions, and we are very proud to have stepped up the quality with a fully injection-molded housing. All other specifications remain the same, including diameter, height, and weight.
With hop harvest in full swing, I've decided to make a 7 gallon beer batch with Wyeast Munich Lager and home-grown wet hops. Ingredients include 15 lbs of Belgian pilsner malt and 8 ounces of wet hops (most likely Cascade and Magnum). In the past years, these hops have had very low alpha acid so 8 ounces might sound like a lot. As of August 27, 2018 one of the carboys is in the middle of a diacetyl rest, perfectly timed by reading the SG and fermentation rate with a Tilt hydrometer. The other fermenter is still a few points away from starting the rest. This one fermented slower most likely because of the higher volume and less yeast pitched from the 2 L starter.
Will keep updated the blog as it ferments and lagers. Looking forward to an Octoberfest brew!
Update Sep. 5, 2018
Beer is tasting great even though it's only been a week or so lagering. It's a bit more bitter than expected, most likely the hops are getting more alpha acid as they mature from their initial planting. Next time will use less for a more subtle bitterness. The beer was also higher OG than most lagers, so it's a little heavier FG than what might be perfect. The same beer in the 2nd fermentor I gave more time to drop another point to bring the attenuation up further. Will see if this extra point made a difference!

Updated July 13, 2019: Our latest install instructions now support the latest Raspberry Pi OS "Raspbian Buster" compatible with the Raspberry Pi 4, 3A as well as all the other versions supported previously. See our latest blog post here on how to install from a fresh image dowloaded from raspberrypi.org.
Updated March 23, 2018: New instructions confirmed to work with Raspbian "Stretch". Tested on Stretch released March 13, 2018. Note: the latest version of Raspbian "Stretch" does not work with the instructions below. We are working on an updated version where this will be resolved.
Follow the directions below if you already have a Raspbian Jessie or Stretch OS running on your network and wish to add the Tilt Pi app to it. Be sure to make a backup of your card in case the installation has any conflicts. If you're starting with a new Raspberry Pi or NOOBS, I recommend downloading our pre-installed image here and overwriting your NOOBS SD card. In the picture below, I have installed Tilt Pi on a SD card image for a 3.5" touchscreen available on Ali Express. Please note their may be unknown incompatibilities with other software installations and may require troubleshooting beyond the scope of these instructions.

Due to an updated nodejs version used in the script "update-nodejs-and-nodered", the bleacon scanning node will fail to install. A workaround is to manually install node package manager, "npm" and then install a version manager "n" for nodejs so that nodejs version 4.x can be installed first before installing bleacon. Once bleacon and dashboard UI are installed, nodejs and node-red can be updated. The instructions below incorporate these changes.
Using SSH from another computer or from a Raspberry Pi directly, open a command line window to enter the following commands. Install node package manager, "npm".
sudo apt-get update
sudo apt-get install npm
Install nodejs version manager, "n".
sudo npm install n -g
Install nodejs version 4.8.7 (this version will work with bleacon)
sudo n 4.8.7
Install bleacon, an iBeacon scanning node for Node-Red. Note: Tilt uses iBeacon format to broadcast data so any device that can scan for iBeacons can connect to it.
sudo npm install node-red-contrib-bleacon -g
Install dashboard UI for Node-Red.
sudo npm install node-red-dashboard -g
Update node-red and nodejs using the script provided by nodered.org. Raspberry Pi specific Node-Red install instructions for Raspbian Jessie.
bash <(curl -sL https://raw.githubusercontent.com/node-red/raspbian-deb-package/master/resources/update-nodejs-and-nodered)
Note: Answer yes to installing Raspberry Pi specific nodes.
Set Node-Red to start on system start up.
sudo systemctl enable nodered.service
Download Tilt Pi “flow” from Baron Brew GitHub account to Raspberry Pi
wget -O /home/pi/flow.json https://raw.githubusercontent.com/baronbrew/TILTpi/master/flow.json
Reboot Raspberry Pi. Node-red will start at boot.
sudo reboot
Run downloaded Tilt Pi app/flow in Node-Red:
curl -X POST http://localhost:1880/flows -H "Content-Type: application/json" -H "Node-RED-Deployment-Type: nodes" --data "@/home/pi/flow.json"
While still on your local WiFi network, use a web browser (Chrome or Firefox) to visit http://raspberrypi.local:1880/ui or http://localhost:1880/ui. If this doesn't work, you may need to find the IP address of your Raspberry Pi and go to http://X.X.X.X:1880/ui where X.X.X.X is your Raspberry Pi's IP address.


Tilt Pi Setup Instructions (Updated April 2020)
See our Tilt Pi setup video here:

What’s Required:
Once you have put together the above 9 items, you can build your Tilt Pi. Below are the instructions:
Functions of the Tilt Pi app are similar to the iPhone/Android app. Please contact Baron Brew at info@baronbrew.com for any issues setting up your system.

]]>

| One thing I've noticed brewing under pressure in a corny keg and using a Tilt hydrometer is that pressure seems to effect fermentation rate. A beer that would ferment in a couple days in a carboy, might take 2-3 times longer under 10+ PSI, most likely this depends on the yeast strain. Further research indicates that the pH of carbonated water is between 3-4 and yeast prefer a pH of 4-4.5 so most likely, the added carbonation is having a real effect of slowing fermentation, even under warmer summer conditions that would make fermentation go faster. I've read about experiments showing that brewing under pressure has no effect on the flavor and in my experience that could be true, but I wanted to see if I left the temperature get a little on the high side due to summer heat and see if the lower pH would counter the effect and the beer still showing no signs of heat related off-flavors, as if fermented slower under lower temperatures. For this experiment I brewed a double batch of Dead Ringer from Northern Brewer. |
Both are under pressure and temperature has been allowed to do what it wants in my garage. I made a big 58 point starter for these batches (since I reduced he volume to 4 gallons for each keg, OG was 1.082 instead of 1.064 target for recipe), fermenting about 30 points in a 2 liter aerated starter before pouring off the top 1.5 liter and then pitching the bottom 0.5 liter, half into each corny keg. It took about 6 hours to show a noticeable drop in SG after pitching, not surprising with a robust aerated starter, WLP001 yeast strain, and pitch temp of 74F. Initially the Google Sheets report showed a fast fermentation until the pressure built up to 12 PSI as visible on the relief gauge. As pressure got higher fermentation rate slowed until a steady fermentation rate as seen in both carboys was established at about 17-18 points per day. I'll be keeping an eye on the fermentation to dry hop at around 30 points and then keep an eye out for an FG of 20 points that is stable before cold crashing. Of course the great part is the beer is already carbonated so am looking to get this on the tap soon. Will follow up on flavor in a couple weeks where I'll be serving at a birthday party. Looking forward to it, cheers! |
Update July 6, 2017 : Both fermenter/kegs are showing a leveling off of SG at around 1.019 for Keg 1 and 1.017 for Keg 2. The extra fermentation in Keg 2 led me to cold crash and tap it first. The attenuation was already pretty high, over 80% so wasn't worried about residual sweetness or body. Usually, I would allow more time to let the fermentation fully stop or show a 0 or positive fermenation rate over a 3 day period, however I wanted to compare this somewhat green keg with the 2nd Keg that I plan to fully dry out for serving at the birthday party in a few weeks. I also wanted to check in advance for any high temperature effects during krausen (up to 77F due to a summer heat spell and high fermentation activity). In my taste tests I noted no off flavors I've tasted before in overheated ferments, so it seemed the heat didn't affect it. Due to the beer being 9% abv, I could taste some alcohol heat, but in a pleasant way the mixed well with the malt and hops. The hops were primarily centennial with a wild card African Queen hops to mix things up a bit. The hops have a bit of spiciness to them that give it a nice complexity compare to some of the summertime session IPAs I've been drinking. My wife tested it too and gave me the thumbs up. We'll see if she actually wants more.
Update July 24, 2017 : So far my wife has only had a few glasses of this batch, but friends and myself have enjoyed it very much. She says she wants a lighter, crisper beer, so next beer will be Kolsch. One thing I learned is that the extra week at 68F post fermentation for Keg 1 didn't change the flavor vs. Keg 2 that had just a few days at FG, so at this point I feel like 3 days at a stable FG is really good enough to start the cold crash. Cold crashing for about a week seemed to clarify and clean up the beer quite a bit, so better to spend the time in the fridge than continuing at 68F. Next up is a Kolsch!
Keg 1
Keg 2 (same wort as keg 1)
]]>However, Baron Brew will still "own" or host the Sheet, so for greater privacy and control, we now offer a way to copy our entire cloud app as we used to suggest with our original app. Simply log in to your Google account, make a copy of the Google Sheet (here) and follow the instructions on the right hand side of the sheet as before (must be logged in to Google to see the instructions). You will also see how you can modify or make multiple templates for your brew log. We look forward to any feedback.
]]>


Happy Brewing! And don't forget to check out Brewstat.us
]]>You can now setup your own Google Sheets based cloud URL with our latest open-source template. The template includes inline instructions on how to copy over to your own Google Sheets account and activate the template as a live web app and get your own cloud URL hosed on your own Google account. See template here:
https://docs.google.com/spreadsheets/d/1ut1wClRrowkYRYm6yQAVuc_Q568stncawv1EuYez2go/edit?usp=sharing
###
UPDATED March 7, 2017:
You no longer need to generate your own cloud URL (although you still can if you want). Just leave the cloud URL field blank, tap the check box, and enter your email address as a comment for the Tilt color you want to log. You can optionally name your beer as well.
# # #
NOTE: the following instructions will still work, but we recommend using our latest template (link above) based on the default Cloud URL in our app and Tilt Pi.
We streamlined and simplified our set-up instructions. Just follow the on screen instructions embedded in the templates below:

UPDATE May 4, 2016: Both the carboy and keg appear to have about the same amount of time left, basically the carboy "caught up". Maybe the warmer temperatures are needed to offset slowdowns from pressure. I pulled out some of the beer from the keg and got mostly yeast, no strange off flavors, but obviously very yeasty. Seems like WLP001 works just fine under pressure. Later I will try brewing at even higher temperatures to see how fast it can brew and see if it can withstand summer brewing!
Looking at the plot below over the last 3 days, shows a downward trend line for SG, suggesting still a little more time to finish up. I will start my Mosaic dry hopping tonight and look for a fully completed fermentation within the next three days followed by a cold crash and racking.
]]>
Update 13 April 2016: Racking and transferring was a little more difficult than a carboy because there is no real racking cane, however it was easy to harvest some yeast that would be great to try for a 2nd round. Beer was already carbonated and tasted great, no sulfury, diacetyl, fusel, "belgiany" or other off flavor and very mild lager flavor. (i.e. creamed corn or metallic). Impressed with the results. Still a little yeasty due to lack of filtering and effective racking. Next time I'll pre-install one of those racking cane widgets or the like to avoid taking beer right from the bottom. Will definitely try again.
My wife says it was "de-lish"!
Recipe for 8.5 gallon batch: 18 lbs 100% bavarian pilsner malt, 2 ounces of US Goldings 60min, 2 ounces of Amarillo at 3min. Tap water treated with sulfite. Hops were kind of random, but it worked out. It's a very lemony, citrus flavor overall and could be mistaken for a wheat beer. Could be served with a lemon. Not too hoppy. Body turned out well-balanced. Looking forward to see how it finishes.
Will update later on the other half of the batch brewed at 50F.


Above: Setup using corny keg, valve, and iPad Mini Brewometer display
Below: Live Data Stream!
]]>We just updated our "Bring Your Own Cloud" solution so you can copy Baron Brew's cloud logging solution and run it under your own Google/Gmail account. Follow the link here for instructions: https://docs.google.com/spreadsheets/d/1ut1wClRrowkYRYm6yQAVuc_Q568stncawv1EuYez2go/edit?usp=sharing
UPDATED March 7, 2017:
You no longer need to generate your own cloud URL (although you still can if you want). Just leave the cloud URL field blank, tap the check box, and enter your email address as a comment for the Tilt color you want to log. You can optionally name your beer as well.
# # #
Hello fellow brewers! Here's how I (Noah) post my specific gravity and temperature reading from the Brewometer to my Google Sheets.
The Tilt iOS and Android app lets you post your data to the cloud. You will need two things to constantly send data to the cloud:
1. A personal google/gmail account (we do not manage cloud data).
2. A dedicated smartphone or tablet to leave plugged in/charging near your fermenter.
As shown above, you can enter a cloud URL (web) destination. If configured correctly, the data will be saved to your personal google account. We have set up a Google Sheet template to demonstrate the functionality. You can copy the sheet and run it in your own account for your own use.
In this example we will start by copying the 'Brewometer Cloud Template' to your personal Google Drive account. You must have a Google account (gmail) in order to complete this step. Open our template below by following the link below.
Option 1: for Temperature in Fahrenheit
https://docs.google.com/spreadsheets/d/1T3cGmwBx01ozWaBmrXIhdMKfzLF0Aafea9WaNsXidZE/edit?usp=sharing
Option 2: for Temperature in Celsius
After opening, copy the file to your account:

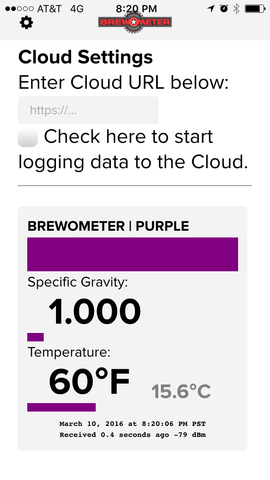
Next, open the 'Script Editor' under the 'Tools' tab.

Script editor will open another tab/window. Under the 'Run' tab select 'setup'.
A dialog box will ask for authorization to run. Click 'Continue' to run.

A new page will open. Click 'Allow'.

From the 'Publish' tab, select "Deploy as web app..."

Select the parameters below to allow anonymous posting to your Google Sheet. In the 'Execute the app as:' drop down menu select 'Me' (this will be your personal gmail account). Under the 'Who has access to the app:' select 'Anyone, even anonymous' Click 'Deploy'.
(Your Brewometer app does not require a username and password to post data.)

Copy your Cloud URL from the dialog box, as seen below, and send or text your unique URL to yourself.

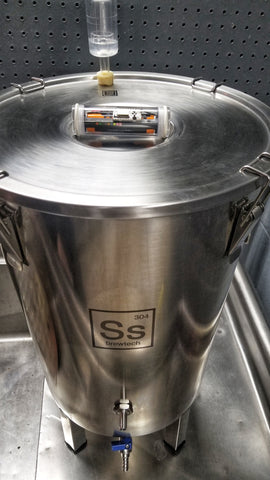
Now, open your Brewometer app and tap the gear button in the upper left hand corner of the home screen. Under 'Cloud Settings' paste the URL you sent to yourself and check the box below to start logging data to the cloud.
![]()

To confirm the app is working, you can open your URL in your web browser and it should return a page with the word "success" followed by the row that was added.
Example:
{"result":"success","row":5}
Rows in your cloud Google Sheet will show as "undefined" if there was no data to post. For example, you will see this when you enter your cloud URL in a browser. Anytime you check the box, data will be posted immediately (forced) to the cloud for each Brewometer showing on your screen. IF your phone is always on with the app open, the Brewometer app will post automatically every 15 minutes, saving up to 8 Brewometers worth of specific gravity and temperature data. (Again, the Brewometer app must be open with your smartphone or tablet plugged in/charging next to your fermenter, and your screen unlocked to post regular data.)
Having trouble with setting up your cloud? We have a pre-configured sandbox cloud app you can test. Note that data from this cloud app will be erased without notice so do no use this app for actual brewing!
SANDBOX Cloud App URL (copy and paste into iOS/Android Brewometer App):
https://script.google.com/macros/s/AKfycbzKkh8UrtqZnEjpYmJW9UZHcQ1eFOyTlxQHtfGqoBwzQXB89P4/exec
SANDBOX Google Sheet (Read-Only) click to view and chart data:
https://docs.google.com/spreadsheets/d/1DXZSoJPorKAKdxDc_es6GM5EaFUM2pFW2x0VUwEheyM/edit?usp=sharing
Questions or concerns? Contact us at info@baronbrew.com.
Happy brewing!


The iPhone/Android app allows you to enter a "cloud URL" that the Brewometer posts to at regular intervals. It does require some basic one time setup (we'll write a blog post on that soon!). Currently, we have tested it with Google Sheets and Spark Fun's data service. Your device will upload to the cloud when your smartphone/tablet is within range of the Brewometer. If you want to get constant data points on the cloud you'll need a dedicated device next your brew (one smartphone/tablet can be used for multiple Brewometers in multiple fermenters - up to 8). Any Bluetooth 4.0 device should work.

]]>

